


How to Install PCLinuxOS: A Step‑by‑Step Guide for Beginners
Meta Description: Learn how to install PCLinuxOS in minutes with our beginner‑friendly, step‑by‑step guide – from creating a Live USB to post‑install tweaks.
📚 Introduction
If you’ve ever wanted to dip your toes into the world of open‑source operating systems without the intimidation of enterprise‑level Linux distributions, PCLinuxOS is a fantastic place to start. Designed with the desktop user in mind, it ships with a polished KDE Plasma (or Xfce) desktop, a huge collection of pre‑installed software, and a reputation for being “just works.”
In this guide we’ll walk you through every stage of the installation process, from preparing your hardware to polishing the final system. Even if you’ve never installed a Linux distro before, by following these steps you’ll have a fully functional PCLinuxOS workstation up and running in about 30‑45 minutes.
Keywords (SEO‑friendly):
- PCLinuxOS installation
- Linux beginners guide
- KDE Plasma
- Live USB
- Disk partitioning
- Open source OS
Hashtags: #PCLinuxOS #LinuxInstallation #OpenSource #KDE #LinuxBeginner #DIYOS
🔎 What Is PCLinuxOS?
PCLinuxOS started as a personal, community‑driven spin of the older Mandrake/Mandriva Linux family. Over the years it has evolved into a rolling‑release distribution that focuses on:
| Feature | Why It Matters |
| KDE Plasma (default) | Modern, visually appealing desktop with extensive customization. |
| Xfce & MATE spins | Lightweight options for older hardware. |
| Pacman (PKGEXTRACT) | Simple, APT‑like package manager that resolves dependencies automatically. |
| Live CD/USB | Test the OS without touching your hard drive; perfect for beginners. |
| Huge software repository | Over 50,000 packages directly available from the PCLinuxOS repo. |
| Community‑driven support | Friendly forums, wiki, and IRC channels for troubleshooting. |
Because of its strong “install‑and‑use‑right‑away” philosophy, PCLinuxOS is often recommended as a first Linux OS for newcomers, yet it also packs enough power to satisfy seasoned users.

📦 What You’ll Need Before You Begin
| Item | Minimum Spec | Recommended Spec |
| Computer | 1 GHz CPU, 1 GB RAM, 4 GB storage | 2 GHz Dual‑core CPU, 2 GB+ RAM, 20 GB+ SSD |
| USB Flash Drive | 2 GB minimum (for Live USB) | 4 GB+ (recommended for faster writes) |
| Internet Connection | Optional (for downloading ISO) | Required for updates & extra packages |
| Backup | N/A | Backup any important data on the target disk. |
| BIOS/UEFI Access | Ability to change boot order | Ability to disable Secure Boot (if necessary). |
Tip: If you’re installing on a laptop with UEFI firmware, make sure it’s set to Legacy/CSM mode or that you have a UEFI‑compatible ISO (PCLinuxOS provides both).
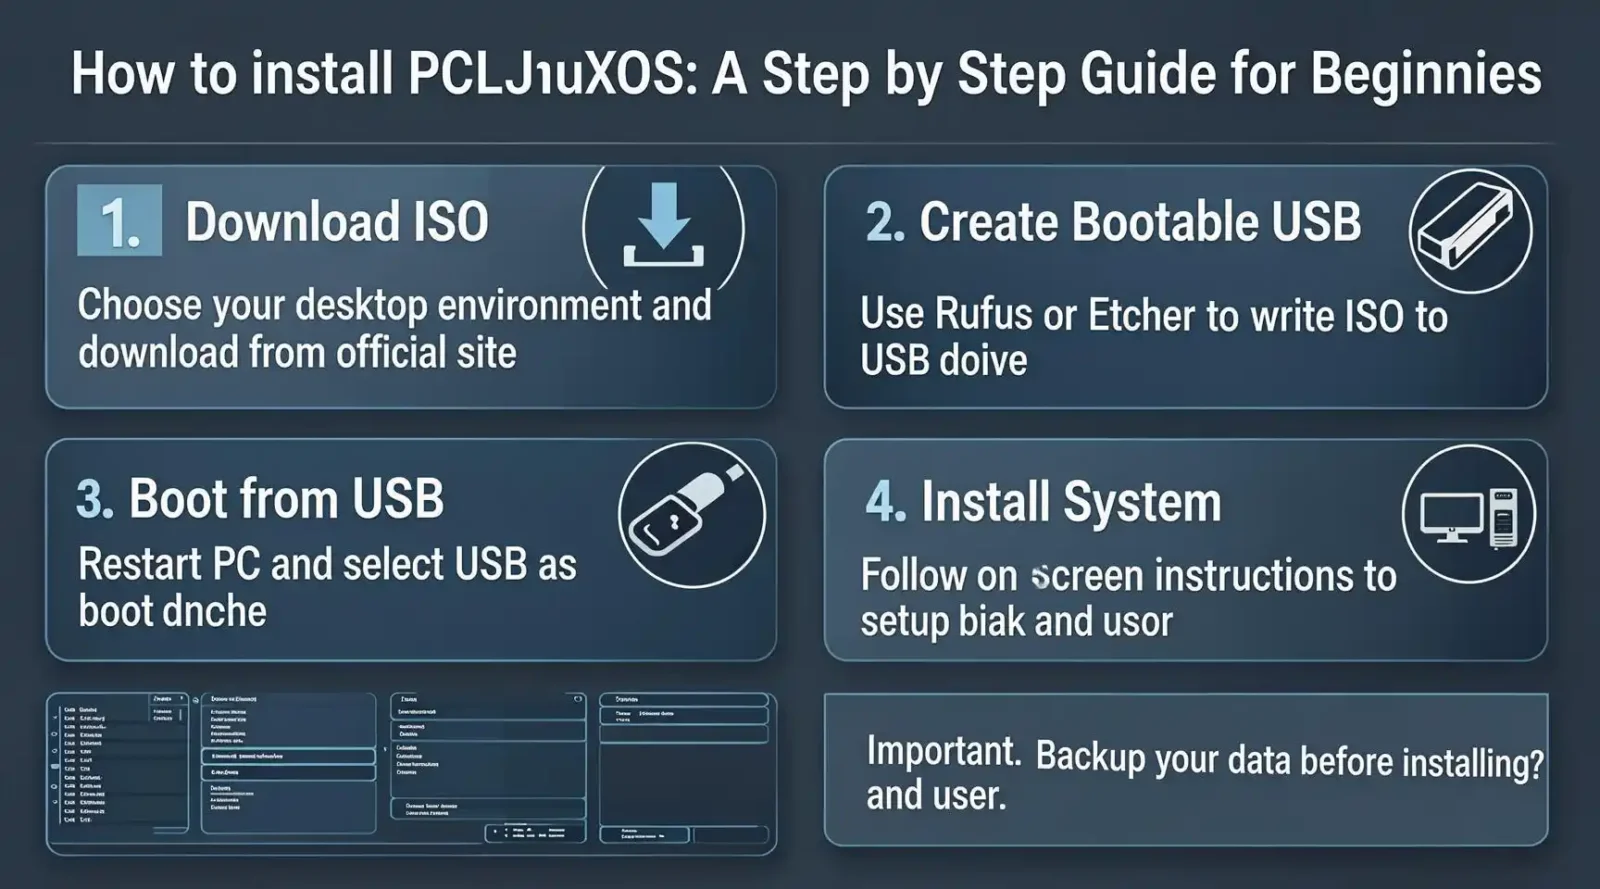
🛠️ Step 1 – Download the Latest PCLinuxOS ISO
- Visit the official download page – https://www.pclinuxos.com/ .
- Choose the edition you prefer:
- PCLinuxOS KDE (default, full‑featured).
- PCLinuxOS Xfce (lightweight).
- PCLinuxOS MATE (classic desktop).
- Click the download link for the latest “Rolling Release” ISO (≈ 1.7 GB).
- Verify the ISO (optional but recommended):
- Download the corresponding SHA256 checksum file.
- Open a terminal (or PowerShell on Windows) and run:
- # Linux/macOS
- sha256sum pclinuxos‑kde‑2023‑xx.iso
- # Windows (PowerShell)
- Get-FileHash .\pclinuxos‑kde‑2023‑xx.iso -Algorithm SHA256
- Compare the output with the checksum on the website. If they match, you have a clean, untampered ISO.
💽 Step 2 – Create a Bootable Live USB
There are several tools you can use; we’ll cover the three most popular cross‑platform options.
| Tool | OS | How to Use |
| Rufus | Windows | 1. Open Rufus → select your USB → choose the ISO → click START. |
| Balena Etcher | Windows/macOS/Linux | 1. Launch Etcher → select the ISO → choose the USB → Flash! |
| dd (Terminal) | Linux/macOS | 1. Identify your USB (lsblk or diskutil list). 2. Run sudo dd if=pclinuxos‑kde‑2023‑xx.iso of=/dev/sdX bs=4M status=progress && sync. |
Important: Double‑check that you are writing to the correct drive (e.g., /dev/sdb). Accidentally overwriting the wrong device will erase data.
🚀 Step 3 – Boot Into the Live Environment
- Insert the USB into the target computer.
- Power on (or restart) and enter the BIOS/UEFI firmware (usually by pressing Del, F2, F10, or Esc during POST).
- Locate the Boot Order menu and move the USB device to the top.
- Save changes and exit – the machine should now boot from the USB.
You’ll be greeted with the PCLinuxOS Live Desktop (KDE by default). This environment runs entirely from the USB and RAM, letting you test hardware compatibility before touching the hard drive.
⚙️ Step 4 – Preliminary Checks in the Live Session
| Check | Why It Matters | How to Verify |
| Network | Needed for downloading updates & extra packages. | Click the network icon → connect to Wi‑Fi or Ethernet. |
| Graphics | Ensure your GPU driver loads correctly. | Open System Settings → Display & Monitor and see if the resolution looks right. |
| Audio | Verify sound works (important for media playback). | Open PulseAudio Volume Control → play a test sound. |
| Keyboard Layout | Confirm correct language layout (especially for non‑US keyboards). | Settings → Input Devices → Keyboard Layout. |
If everything looks good, you’re ready to install!
📥 Step 5 – Launch the Installer
- On the desktop, click the “Install PCLinuxOS” icon (or find it in the System → Install menu).
- The installer will open in a friendly wizard with four main screens:
- Welcome – Choose language & keyboard layout.
- Partitioning – Decide where to install the OS.
- User Setup – Create a user account and set a password.
- Summary – Review before committing changes.
Let’s dive into each screen.
🗂️ Step 5‑A – Language, Keyboard & Timezone
| Option | Description |
| Language | Select your preferred language (e.g., English – United States). |
| Keyboard Layout | Pick the appropriate layout (US, UK, AZERTY, etc.). |
| Timezone | Click the map or drop‑down to set your region. This sets the correct system clock. |
| Locale | Keep the default en_US.UTF‑8 unless you need another locale. |
Click Next when satisfied.
📂 Step 5‑B – Disk Partitioning
- Choose Installation Mode
| Mode | When to Use |
| Automatic (Use Entire Disk) | Fresh install on an empty drive; quickest setup. |
| Manual (Custom) | You need dual‑boot, keep existing OS, or want custom partition scheme. |
Beginner Tip: If this is a brand‑new machine or you have a spare drive, go with the Automatic option.
- Understanding the Recommended Layout
If you let the installer handle it, it will typically create:
| Partition | Size (approx.) | Purpose |
| /boot | 200 MB | Stores kernel & bootloader files. |
| swap | RAM size ≤ 2 GB (or 1‑2 × RAM if you plan to hibernate). | Provides virtual memory. |
| / (root) | Remainder (≥ 15 GB) | Holds OS files, applications, and user data. |
- Custom Partitioning (Manual)
Below is a common manual layout for dual‑boot with Windows:
| Partition | Mount Point | Size | Filesystem |
| /dev/sda1 | /boot | 500 MB | ext4 |
| /dev/sda2 | swap | 4 GB (or 2‑×RAM) | swap |
| /dev/sda3 | / | 30 GB | ext4 |
| /dev/sda4 | /home | Rest of the disk | ext4 |
Steps to create them manually:
- Select “Manual (Custom) Partitioning” → click Add.
- Choose the device (e.g., /dev/sda).
- Set size and mount point.
- Choose filesystem (ext4 is a safe default).
- Repeat for each partition.
- Ensure the boot loader (GRUB) is installed to the primary disk (e.g., /dev/sda).
Once your layout is ready, click Next.
🙍♂️ Step 5‑C – User Account & Password
| Field | Recommendation |
| Full Name | Your real name (for display purposes). |
| Username | Lower‑case, no spaces (e.g., john). |
| Password | Strong, at least 12 characters; mix of upper/lower letters, numbers, symbols. |
| Root Password | Optional – you can keep the root account locked and use sudo. PCLinuxOS allows you to set a separate root password if you prefer. |
| Automatic Login | Disable for security; you’ll be prompted at each boot. |
Click Next once you’ve filled out the fields.
📊 Step 5‑D – Installation Summary
You’ll see a concise recap of everything you chose:
- Language, keyboard, timezone
- Partition scheme
- Username & passwords
- Packages selected for installation (default includes KDE, LibreOffice, Firefox, etc.)
Double‑check each item. If anything looks off, click Back to edit.
When satisfied, click “Install”. The installer will now:
- Format the partitions.
- Extract the base system onto the target drive.
- Install the GRUB bootloader.
- Set up initial users.
Progress Indicator: The installation usually finishes within 10‑20 minutes on modern hardware.
🎉 Step 6 – First Boot Into Your New PCLinuxOS
- When the installer prompts you, remove the USB stick (or let the system reboot automatically).
- The GRUB menu appears. You should see an entry for PCLinuxOS (and possibly Windows, if you dual‑boot).
- Select PCLinuxOS and press Enter.
You’ll be greeted by the KDE Plasma desktop (or Xfce/MATE, depending on the spin you installed).
Quick Post‑Install Checklist
| Task | How |
| Update the system | Open a terminal and run sudo apt-get update && sudo apt-get upgrade (PCLinuxOS uses apt-get compatible syntax). |
| Install additional software | Use the graphical PKGEXTRACT or terminal sudo apt-get install <package> (e.g., sudo apt-get install vlc). |
| Enable proprietary drivers | System Settings → Driver Manager → Install recommended NVIDIA/AMD drivers if needed. |
| Configure backups | System Settings → Backup → Choose schedule and destination (external HDD, cloud, etc.). |
| Personalize the desktop | Right‑click the desktop → Configure Desktop → Choose wallpaper, panel layout, widget set. |
Congratulations! Your PCLinuxOS system is now fully operational.
🛠️ Advanced Tweaks (Optional)
Even if you’re a beginner, you might want to explore a few enhancements that make the OS feel even more polished.
- Enable Flatpak & Snap Support
# Enable Flatpak (adds Flathub repo)
sudo apt-get install flatpak
flatpak remote-add –if-not-exists flathub https://flathub.org/repo/flathub.flatpakrepo
# Enable Snap (if you prefer Canonical’s packages)
sudo apt-get install snapd
sudo systemctl enable –now snapd.socket
Now you can install universal packages like snap install spotify or flatpak install flathub org.kde.krita.
- Set Up Timeshift for System Snapshots
sudo apt-get install timeshift
sudo timeshift-gtk # Run the GUI, choose RSYNC mode, schedule daily snapshots.
Timeshift lets you roll back the entire system if an update breaks something.
- Install Oh‑My‑Zsh for an Enhanced Terminal
sudo apt-get install zsh
chsh -s $(which zsh) # Makes Zsh the default shell.
sh -c “$(curl -fsSL https://raw.github.com/ohmyzsh/ohmyzsh/master/tools/install.sh)”
Enjoy auto‑completion, themes, and plugins.
- Fine‑Tune Power Management (Laptops)
- Open System Settings → Power Management.
- Enable “Dim screen on inactivity” and “Suspend on low battery”.
- Install tlp for advanced power profiles: sudo apt-get install tlp tlp-rdw && sudo tlp start.
- Configure Firewall (UFW)
sudo apt-get install ufw
sudo ufw enable
sudo ufw status verbose
Blocks unwanted inbound connections while allowing outbound traffic.
📚 Frequently Asked Questions (FAQ)
| Question | Answer |
| Do I need to disable Secure Boot? | PCLinuxOS doesn’t provide a signed bootloader out‑of‑the‑box, so you’ll need to either disable Secure Boot or enroll a custom key. Most users find it easier to disable Secure Boot in the firmware settings. |
| Can I install PCLinuxOS alongside Windows 10? | Yes. Choose the Manual partitioning route, shrink the Windows partition from inside Windows (Disk Management), then create at least a / and swap partition for Linux. The installer will detect Windows and add an entry to GRUB. |
| My Wi‑Fi isn’t detected in the Live session. What now? | Many Wi‑Fi chips need proprietary firmware. After installation, run sudo apt-get install linux-firmware and reboot. If that fails, search the PCLinuxOS wiki for your specific Wi‑Fi chipset. |
| Why does the installer ask for both user and root passwords? | PCLinuxOS offers the option to lock the root account for extra security. If you leave the root password blank, you’ll use sudo with your user password for administrative tasks. |
| Where are updates stored and how often should I apply them? | The update cache lives in /var/cache/apt/archives. Run updates at least once a month (sudo apt-get update && sudo apt-get upgrade). Use Timeshift for system snapshots before major upgrades. |
📖 Additional Resources
| Resource | Description |
| Official PCLinuxOS Wiki | Comprehensive documentation, troubleshooting guides, and how‑tos. |
| PCLinuxOS Forums | Friendly community where you can ask questions and share tips. |
| IRC Channel #pclinuxos (Libera.Chat) | Real‑time help from experienced users. |
| YouTube – “PCLinuxOS Adventures” | Video walkthroughs covering installation, tweaks, and gaming on PCLinuxOS. |
| PKGEXTRACT Documentation | Learn advanced package management features unique to PCLinuxOS. |
🛡️ Disclaimer
The information in this article is provided for educational and informational purposes only. While every effort has been made to ensure accuracy, the author and publisher are not responsible for any loss of data, hardware damage, or other issues that may arise from following these instructions. Always back up your important files before modifying disk partitions or installing a new operating system. Use the guide at your own risk.
🎬 Closing Thoughts
Installing a Linux distribution can feel intimidating, but with a distribution as welcoming as PCLinuxOS, the learning curve flattens dramatically. By following this step‑by‑step guide you’ve taken the first major stride into the world of open‑source computing—one that can empower you with a secure, customizable, and cost‑free operating system.
Now that your system is up and running, consider exploring the vibrant ecosystem of Linux applications, community projects, and customization options that await. Whether you’re aiming to replace Windows entirely, set up a development workstation, or simply experiment, PCLinuxOS provides a solid, reliable foundation.
Happy hacking, and welcome to the Linux community! 🚀
Keywords used: PCLinuxOS installation, Linux beginners guide, KDE Plasma, Live USB, Disk partitioning, Open source OS
Hashtags: #PCLinuxOS #LinuxInstallation #OpenSource #KDE #LinuxBeginner #DIYOS


Leave a comment